Friday, December 22, 2023

A diary of modifications to our 2021 Aliner Expedition Trailer

Our first trailer experience was a 23-foot ultralight Rockwood. We knew nothing about trailers. The first, unfortunate, lesson was that even tho' a used trailer may look pristine, because it was used for only two weeks a year for the last 10 years, the tires are not pristine. Tires only last about six years no matter how good the tread may look. In our second year of using the trailer, one of the tires on the Rockwood exploded on the highway, tearing apart the wheel well and all the infrastructure above it, the water, gas, electric and drains. All of that is inaccessible to repair without removing much of the cabinetry.

Our second trailer was a big, heavy 30-foot Jayco with a slideout. Much more comfortable to live in but the big frontal area and weight made for very bad gas mileage. When towing west to the Rockies, we averaged six to 10 mpg. With  the SUV to pull it requiring premium gas, the cost for fuel was killing us.

I was convinced that the biggest cause of low gas mileage was the drag pulling the tall trailer through the air at freeway speeds. I had seen folding trailers that unfolded into an A-frame but it seemed the space would be reduced as the top of the trailer tapered down. As volunteer campground hosts in the summer for the USFS we get to see many different types of camping trailers. Soft-sided trailers are not allowed in our campground due to grizzly bear issues, so soft-sided trailers are not an option for us.

Recently, some campers showed up with folding A-frame trailers that have dormers that unfold, making the trailer roughly rectangular. They are made by a company in Pennsylvania called Aliner. They make many different models but the one that looked like it might suit our kind of camping was the Expedition model.

We talked to owners in our campground and found that the Expedition could be pulled successfully with a six-cylinder light SUV. Like a Toyota Venza or Kia Sorento.

We bought a 2019 KIA Sorento with a six-cylinder engine and a towing capacity of 5000 lbs. You need to check carefully because the towing capacity can vary greatly with the different packages. The LX with AWD pulls 5000lbs when other packages have a limit of 3000lbs. Also, you must add the weight of everything you're going to carry. 

So this seemed like a perfect way to lower our gas mileage, pull a more manageable-length trailer and lessen our carbon footprint. On our maiden voyage, fully loaded, we got a minimum of 16 mpg and a maximum of 22mpg.

I am a terminal tinkerer, especially when I get something new, so let the mods begin!


Carrying Bicycles

One of the main reasons we travel is to ride our mountain bikes. In doing research, I saw pictures of Aliners with 2" hitch receivers on the back. So I thought, fine, we will put our bike rack on the back and that will solve the bike problem.

Boy was I wrong. The issue of a bike rack on the back of an Aliner is a known problem I have found. Most people will tell you that it can't be done and if you do you will rip the bumper off the trailer, sending your bikes down the highway to wreack havoc or bend your frame around the axle. This caused us great stress because I found this out after we had purchased the Aliner.

The requirement of carrying bikes lead me down a long path of modifications.

The next thing I found was that our current bike rack was not certified for  use on the back of a trailer. Vibrations from rocking back and forth and up and down stresses the welds on some bike racks causing catastrophic failure. The folks at Hollywood Racks claim that they have seen 100 failures with racks used on the back of trailers and do not allow their racks to be used in that application. So now we needed a new rack. It turns out that a Canadian company, Swagman, makes a rack certified for use on the back of a travel trailer. Swagman bolts the rack together rather than depending on welds and they have you lock the quick release, that allows you to fold up the rack when not in use, so that it reduces the vibration.

I then called ALiner and talked to Kevin,the head of service. He told me you absolutely canNOT add a 2" hitch receiver to the back of an Aliner. I asked him "Then why do I see pictures of Aliners with 2" hitch receivers in the back?"

He explained that, in the past, Aliner offered 2" hitch receivers with a strict limit of 125lbs. But so many people abused that limit, with dire consequences, that they stopped adding hitches.

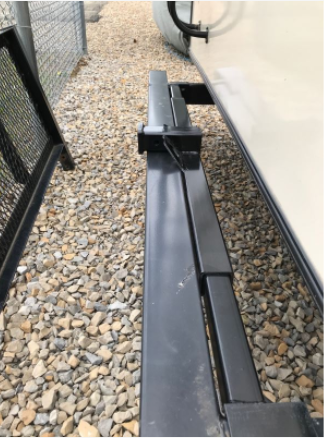
Well, that left us with a big problem. After doing a lot more research I found that one of the problems is the Aliner bumper. It is a U-shaped bumper welded to the end of the frame. It is easy to overload something attached to it and rip the bumper off the back of the trailer. 

To solve this problem, I found an add-on by Ultrafab. It is a tube of steel that spans the two frame members that the bumper is attached to, and is welded to join the two frame members with the steel tube. So there is no weight on the bumper. The steel tube Ultrafab comes with a 2" welded-on receiver.


I found a YouTube video where someone used this device to successfully reinforce the frame allowing him to add a bike rack. No guarantees, but if I kept to the 125lb limit this seemed like a safe solution. After 1,200 miles, so far so good. We do inspect the welds at every gas stop and I strap the bikes down so they cannot sway around.

Adding extra weight in the back will change the weight on the tongue. Just like a teeter totter, if you put more weight on the back, you need to balance the weight in the front to maintain the tongue weight. If the tongue weight is not 10-15% of the trailer gross weight you can get sway where the trailer starts to move from one side of the road to the other in oscillations that, in the worst case, can cause it to flip over. Not good. But you must keep to the limits of your tow vehicle hitch to not overload the tow hitch with too much weight on the ball mount.

These are all very serious considerations when driving down the highway.

We now realized, unlike with the Jayco, where we just took what ever we wanted to with us, we were going to have to be much more careful with the ALiner. So we started a spreadsheet and measured the weight of everything we were going to put into the trailer. It was very revealing.


In no way am I recommending you do what we did by adding a bike rack. What I've described here is just information and it could be a bad idea.

>> After 3600 miles all is well. No cracks in the welds and no trouble with the bikes <<


More storage

Because we host a campground all summer, in the Beartooth mountains of Montana, we need different things than someone who camps in a different campground every night. 

We needed more storage. So I added a cargo carrier to the front of the trailer. I had seen that some of the older Aliners had a built in fiberglass storage box on the tongue. I found a cargo carrier I thought would work on the tongue and a heavy-duty pvc carry bag that fit its dimensions. The cargo carrier was designed to be used on the back of a truck and installed on a 2" hitch receiver. I eliminated the support that would connect it with a 2" hitch receiver and, instead, used u-bolts to attach the flat cargo carrier to the tongue of the trailer.

The cargo carrier adds about 50lbs to the front so I removed the battery, that weighs about the same, to keep the weight balanced.


There is a domino effect with the trailer in that every change affects something else. The addition of the cargo carrier affected the turning radius of the trailer. We added a 10" hitch extension onto the hitch to move the cargo carrier back away from the tow vehicle. Doing this de-rates your hitch by 33%. Our hitch is rated at 500lbs tongue weight so the result is a rating of 335lbs. This is too close to the actual tongue weight of the trailer so I changed the hitch to a 750lb-rated hitch to get a margin of error.


Down the Rabbit hole: The Electrical system

No good turn goes unpunished. Removing the battery to save weight on the tongue led me to completely revise the electrical system. 

The battery that came with the trailer was a simple lead-acid deep-cycle battery. The problem with these older batteries is that they out-gas hydrogen gas, which can explode, when they are charging so you really don't want them inside the trailer. They are also much heavier and bigger than newer Lithium Iron Phosphate (LiFePo) batteries. But lithium batteries can be dangerous if they are not respected and handled correctly. Lithium burns when exposed to air. Lithium battery makers seal the cells in a package in a vacuum. If you damage that seal, you can expose the cells to air which will cause the lithium to ignite and burst into flames. Don't get me wrong, most of us carry around a lithium battery in our pocket all day without issue. It's called a cell phone.

Designing a power system for our trailer would require care and good workmanship. The basic design would require the batteries and cables to connect them. Then some way to charge those batteries with the special requirements of lithium. Then a way to distribute the power to all the devices in the trailer. I would need a DC to AC converter or inverter to convert the battery power to AC power like we use at home. Then a management system to monitor the batteries and their output. That sounds like a lot of work. Because I am basically lazy, I decided to let someone else do it all for me. 

I bought a "Powerstation." The one I got is made by a company called Bluetti (Blue T). It is a box with a built-in battery, charger, monitoring system, circuit breakers, 12v DC output, 110v AC output and is ready to be charged by solar when desired with a built-in solar charge controller. There are many models with different capacities. The Aliner claims, with a sticker on the outside, that it is solar ready but that simply means it has a connector on the outside that goes nowhere. It is very much not ready for solar charging. I positioned the Bluetti over the axle to keep the weight balanced.


Now that I had all the electronics in one box, I could figure out how to distribute the power. I already had the old distribution system that I could modify, so I did not have to rewire the whole trailer.

In opening up the distribution system under the bed, I found a rats nest of wire nuts. House wiring commonly uses these little plastic caps to join two wires together. But houses use solid copper wire. It is very stiff and the wire nuts have little metal blades inside that cut into the two wires being joined to mechanically connect them.


But the trailer uses stranded wire, because everything is flexing all the time. Wire nuts are not my idea of a good way to make connections with stranded wire. I proceeded to trace out and document how the wiring was connected. Then I changed the connection system to use terminal blocks. Then each wire has a place on the terminal block, neat and clean. Each wire has a connector crimped on and then the connector is screwed into the terminal block. It is easier to troubleshoot and more secure.


Our Expedition came with a power center, which is a combination of an AC breaker panel, where the power comes in from outside the trailer and then goes through a main breaker, and then the power is distributed to the outlets in the trailer through individual breakers for different circuits like the microwave and refrigerator.

One breaker supplies power to a DC power supply that produces 12vdc to charge the lead acid battery, the lights and other devices that run off 12vdc.

The output of the DC power supply goes through a fuse panel which connects to all the DC devices. The purpose of the AC breakers and the DC fuses is to protect the wires going to all the devices such that, if a device fails and tries to pull excessive power that could start a fire, the breaker or fuse breaks the circuit saving the wire and cutting off power to the failed device.

I decided to use the old power distribution system to save myself having to rewire the whole trailer. First, I found the circuit breaker going to the DC power supply, and with all the power off, of course, I removed the DC power supply. I did not need it because the Bluetti was now going to supply power to the DC devices and the Bluetti has its own battery..

I simply noted the wire coming out of the DC power supply that feeds the fuse panel and ran a new wire from the Bluetti DC output to replace the DC power supply feed. 

Next, in order to use the old AC distribution system, I added a new main breaker box with a main breaker in it to feed one outlet. That outlet would charge the Bluetti and supply pass-through AC, which allows the Bluetti to pass AC through itself directly to AC devices plugged into it when it is connected to outside AC. No battery power used. Then I ran a new wire from the Bluetti AC outlets to the old AC distribution panel into the old main breaker. Now all the AC outlets in the trailer would be powered by the Bluetti AC output.

Since the Bluetti is capable of being charged by solar panels, because it has a built in solar charge controller, my next project will be to wire the solar panel socket on the outside of the trailer to the Bluetti.

All of this series of mods just because I wanted a bike rack on the back of the trailer :-)

Thursday, December 21, 2023

After the major mods, the Kitchen

Next, we addressed the interior space and more work on storage. I looked at many of the Aliner forums on the internet and gathered as many good ideas as I could.

One of the best ideas for storage is the over-sink kitchen rack. This unit does a wonderful job of storing dishes, pots and pans, utensils. It is very convenient. I think the key to the smaller space of the Aliner is having a good system to organize and provide the functionality you need, without making it complicated and difficult. This rack stores all the kitchen items and makes them very easy to access. There are different versions available so measure the width you need across your sink and stove version for clearance.


We leave it assembled and chose carefully for the right height that allows the unit to sit on the floor during travel and clear the walls when folded down.  

I saw a lot of ideas on making shelf storage up high. I did not want to have something that depended on a curtain rod that might slip and fall. Nor did I want a shelf unit hung by a chain that swings. So I designed a shelf that sits on wooden legs. The legs fold down, with hinges, when the trailer is folded down. There are wooden supports that hold it together. The wooden beam across the support legs affords a place to put LED lights that help illuminate the kitchen area. The shelf is a great place to put all our clothes, in Mountainsmith storage bags. Quick to access and out of the way.

We added another refrigerator because we have limited access to grocery stores in the summer. It also was chosen to fit on the floor during travel without interfering with closing the trailer down.

Next, we carefully chose tubs and containers that fill completely as possible, the space under the sink, across under the counter, and under the settees. This allows the tubs to be removed and put on the counter to get something and returned to their storage spot without having to rummage through a cabinet while bending down.

I also cut openings under the settees and installed doors to access what is under the settees without having to remove the cushions.This is simpler than trying to make drawers and affords more efficient storage.

More Storage! More Storage! - Score! and the crowd goes wild.

So, we have the kitchen taken care of and a place to put our clothes, but there is always a need for more storage. My better half came up with the idea of using these over-door hanging shelves and they work great. Hooks for jackets and sweaters and baskets for other things.


Wednesday, December 20, 2023

Outside

One thing I was not excited about was the sink drain going to a bucket. I found an adapter to connect the sink drain threads to a standard RV septic. Now our sink drains into the septic and we don't have to empty a bucket each time we wash dishes.


Valterra T01-0091VP Swivel Drain Connector - 90°, 1-1/2" x 3/4", Black

VALTERRA T1020-5VP Gray Water Drain Adapter


I do like decorating things and since we spend our summers watching wolves the wolf family decal seemed right.

A canopy helps keep the sun off and the side of the Aliner cool. 


I like this little bike garage to keep the sun and rain off the bikes.